


If you aren’t already, you should consider using code version control in Azure Data Factory or Azure Synapse Analytics workspaces. This blog post explains how to enable Azure DevOps. It will also help you meet the pre-requirements (create Azure DevOps project) and commit changes between branches. This is a must-do immediately after you create the service in your development environment.
Azure Synapse Analytics Workspaces and Azure Data Factory are fully integrated with code version control, either Azure DevOps or GitHub. This blog post explains how to enable it.
Table of Contents
Create an Azure DevOps Project
To start, create a new project in Azure DevOps.

Then, make the repository private. You can choose between TFS and Git (1) and Agile and Scrum (2). I am a Scrum master, so I always go with Scrum.

Once the project is created, give access to other users and disable capabilities that you won’t use. You always can enable them after later.
Important!
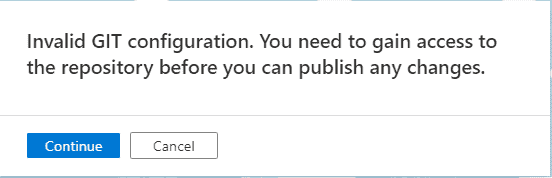
If you don’t give your team members access, they won’t be able to use the repository in Azure Synapse Analytics / Azure Data Factory.

The users who don’thave access to the repository will see the following alert.
Now, you are ready to enable code source version control in Azure Data Factory or Azure Synapse Analytics.
Configure Azure DevOps in Azure Synapse Analytics (valid for Azure Data Factory)
Next, to enable code source control in Azure Synapse Analytics or Azure Data Factory, go to the drop-down at the top of the screen (1) or you can do it from the Manage Hub (2)

The following window will appear so you can select Azure DevOps Git or GitHub.

In this tutorial, I will choose Azure DevOps Git. Choose your account and click next.

You can now fill out the information to set up a code repository.

- Select a name for the repository. It will create one for you.
- Define a collaboration branch (you will create more later). This is where developers can collaborate and merge changes from their branches before they are ready to be deployed into production by using the Publish branch (3).
- The code that is the source of truth and is ready to be deployed to production.
- Import the existing solution in the new code repository.
Finally, click apply.
You need to create a working branch. This is a copy of the master branch and your workspace for applying changes. This helps to create multiple streams of work (developers working on changes at the same time).

Done! You configured code version control in your Azure Synapse Analytics or Azure Data Factory.
Validation of configuration
In Azure Synapse Analytics or Azure Data Factory, you will find different branches.

You can commit single changes or “commit all.”

When you commit, your branch registers the changes.
In your Azure DevOps, you can see the new repository.

In Azure Synapse Analytics Workspaces, there will be more folders than in Azure Data Factory.

Committing changes in Azure DevOps
The next step is to merge your changes back to the collaboration branch. Click to create a pull request.

This will take you to Azure DevOps to merge the changes into the collaboration branch.

Approve and complete the changes (you could have rules, so you are not the one approving and reviewing your own changes!).

If you want to delete your branch because you are not going to apply any more changes, you check the option and click complete merge.

Now your changes are available in the collaboration branch (master) and everybody has access to them.
You can find a summary on the Commits page.

Deploying to Publish branch
If you want to publish a set of changes to the Publish branch before you release them into Production, click publish. The idea is then to use Azure DevOps pipelines to release the changes to a new environment.

It will show you a summary of all the changes to apply. Click OK.

In Azure DevOps, you will see the changes coming through.

Now, the changes in the Publish branch can be released to the next environment (Test, Production, etc.).
Summary
Today, you’ve configured code version control for Azure Data Factory / Azure Synapse Analytics Workspaces without writing a single line of code. Everything is fully integrated with Azure.
What’s Next?
In upcoming blog posts, we’ll continue to explore Azure Data Services features.
Please follow Tech Talk Corner on Twitter for blog updates, virtual presentations, and more!
If you have any questions, please leave a comment below!

4 Responses
Deepak
09 . 04 . 2021Hi David,
Thank you for the detailed steps. Very well explained. I have a question, recently I did a POC on integrating Azure data factory with Git hosted in Azure DevOps. Now I am looking out for a solution where in I want to build and release Azure SQL and Azure Data factory work at the same time. Just to make sure the SQL dependencies are not left behind or either way. Is it possible to club the build and release of 2 separate services in one single go?
Regards,
Deepak
David Alzamendi
10 . 04 . 2021Hi Deepak,
If you are trying to do CI/CD to deploy to another environment, this will be my suggestion:
Create an Azure DevOps CI/CD pipeline for your Azure Synapse Analytics.
Create an Azure DevOps CI/CD pipeline for your database project.
Having the 2 pipelines separately will give you some flexibility, you might want to deploy them independently.
Then you can create a third pipeline that executes the 2 pipelines already created:
The first step in this pipeline will be to execute the database CI/CD pipeline
The second step in this pipeline will be to execute the Synapse CI/CD pipeline
This will ensure that before you release any Synapse artifacts, it will deploy the database objects.
Let me know if I can provide any other information.
Regards,
David
Eric
05 . 05 . 2021Hi David,
We have noticed some issues with deleting objects and how CI/CD for Synapse workspace objects doesn’t handle the deletions. I noticed in your example above that you had a SQL script listed as delete. How do you get the objects to delete when deploying to the next environment? The TemplateForWorkspace.json file in DevOps does not contain the deleted object, so how does the next environment know that it is something that should be deleted? Currently, it doesn’t seem to delete any objects. Is there a trick to enabling deletes to be captured and applying those deletes when the release pipeline executes? Thanks.
Eric
David Alzamendi
12 . 05 . 2021Hi Eric,
That’s the expected behaviour, it does not work for deleted objects. You will need to create a custom component that looks at this or wait for Microsoft to publish the solution (as they did with Azure Data Factory)
Regards,
David