Table of Contents
Introduction
In this blog post, you’ll learn how to apply Dynamic Data Masking to your Azure SQL database. It’s also available in Azure Synapse Analytics or Azure SQL Managed Instances. The only difference is that this option is built into the Azure portal for Azure SQL databases.
Data Masking helps you replace sensitive result sets with other characters and stop unauthorized users from seeing this information.
For example, you can mask:
- Credit card numbers
- Social security numbers
- Personally identifiable information (PII)
Dynamic Data Masking allows you to define different rules to mask your data. You can configure them using T-SQL, PowerShell libraries or the Azure Portal. This type of masking is available for Azure SQL Databases, Azure SQL Managed Instances and Azure Synapse Analytics (SQL Pools).
Now, let’s look at enabling this feature by using the Azure Portal and an Azure SQL Databases.
Enable and Configure Dynamic Data Masking
To begin, find the Dynamic Data Masking option within your database.

Next, once that you clicked the DDM option, you’ll see the following screen:

- Add new masking rules
- Existing masking rules
- SQL Users Excluded from applying the masking rules
- Recommended masking rules provided by Azure
To create one, select “Add mask.”

During the creation of the masking rule, select a schema, table, and column names where you want to apply the masking rule. Finally, select which masking rule to apply.

Azure offers different masking rules depending on the type of data that you want to mask.

Once you are ready, hit the “Add” option.

Now, save the masking rule.


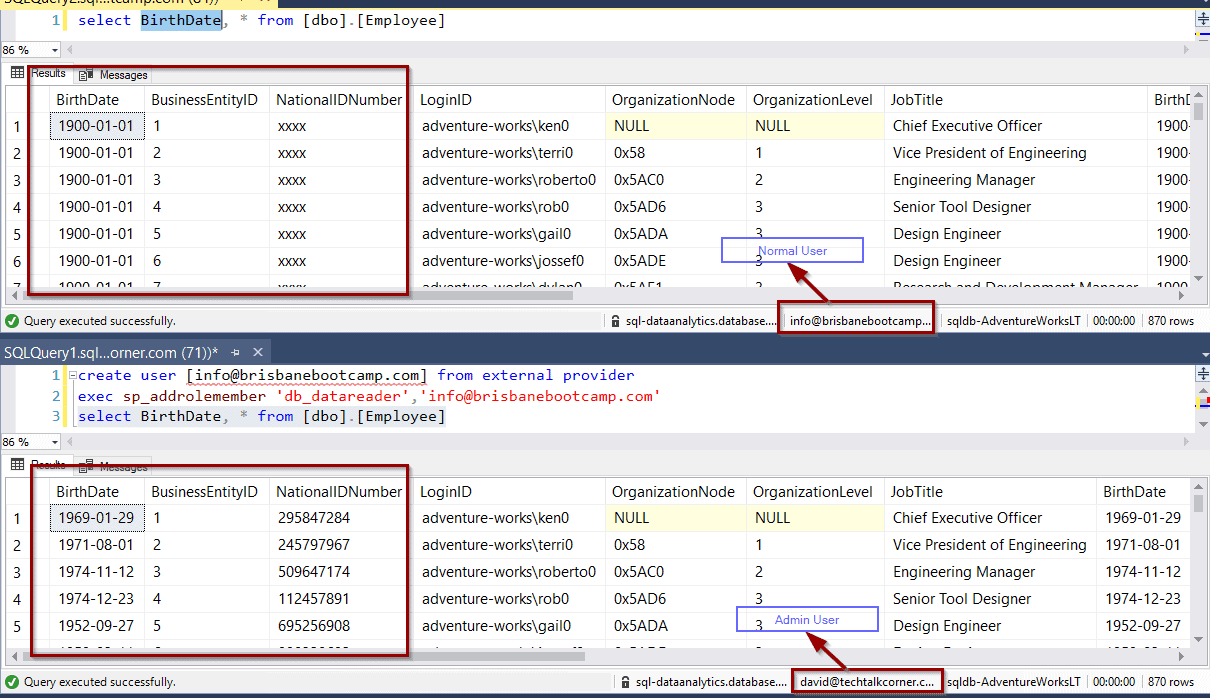
Testing Dynamic Masking Rules
To test your DDM Rule, you need to use a non-admin user.

Summary
In summary, you’ve configured your database to take advantage of Dynamic Data Masking. Now you’re ready to mask sensitive data.
Final Thoughts
I find this to be yet another easy to configure option within Azure databases for securing your data. I think that many users don’t realize how easy it is to get started with this kind of masking. You can certainly extend and customize it using T-SQL or PowerShell.
What’s Next?
In upcoming blog posts, we’ll continue to explore some of the features within Azure Services.
Please follow Tech Talk Corner on Twitter for blog updates, virtual presentations, and more!
If you have any questions, please leave a comment below!